Ever forget to send an invoice until a month after a project finished? Lose track of a new client or project for a few days? Or perhaps you’re getting so many new leads that it’s become harder to keep up!
If so, it’s probably high time for you to try a customer relationship management (CRM) solution. A customer relationship management system (CRM) will help you store & track important prospect and customer contact information and data.
The problem is that most popular CRM tools (ie. Salesforce, HubSpot), are overwrought and far too feature-dense for the needs of a sole proprietor, freelancer, or agency. Don’t you wish you could track it all in a simple spreadsheet?
Fortunately, you can do exactly that, with the Google Sheets CRM template! We created this spreadsheet template to manage clients for our own award-winning design agency and have used it for several years now (managing over 300+ customers and 2.5k+ prospects) — now we’re making this available for everyone:
If you’re looking for an easy way to get started, keep reading. We’re going to show you how to use Google Sheets as a CRM in just five easy steps.
(FYI: This article will show you how to use our CRM spreadsheet template; if you don’t have it yet, you’ll probably want to go ahead and grab it here.)
Start using Google Sheets as your CRM in 4 easy steps:
1. Confirm Google Sheets is the right CRM for you:
Not every business is built to use Google Sheets as a CRM. Most organizations with over 25+ employees might prefer to use CRM software like Salesforce or Pipedrive, which offer more advanced workflows & automation.
That said, in the same vein, businesses with less employees (ie. freelancers, agencies, small businesses, and sole proprietors) usually find most CRM software too complicated and overwrought for their needs. This is where nothing can truly beat the versatility of the trusted spreadsheet.
With Google Sheets (unlike Excel), you can easily set up integrations with online data sources (whether using Google Apps Script, or no-code tools like Zapier), which makes it ideal for storing customer information.
We created the Google Sheets CRM template to manage clients for our own award-winning design agency with over 300+ customers; now we’re making it available for anyone to use! We’ve relied on this template for several years to successfully manage projects with award-winning clientele like Fortune 100 companies and Forbes 30u30 alums.
If you need a quick & dynamic way to store contacts for your small business or team, then the Google Sheets CRM could be the perfect solution for you.
2. Download & copy the Google Sheets CRM template
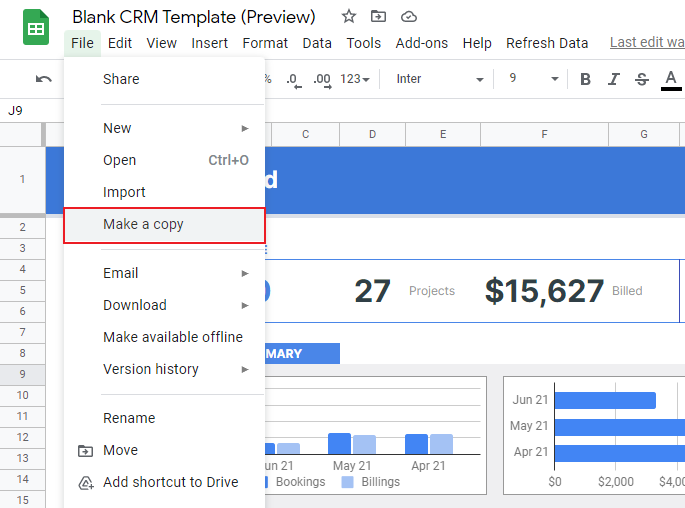
To start, you’ll want to make a copy of our Google Sheets CRM template (if you haven’t already): simply open it up and select ‘File > Make a copy’ in the menu. Now, you’ll be able to edit the Google Sheets CRM as your own in your Google Drive — thus saving you countless hours creating your own CRM, with nifty features like email & time-tracking sync built-in!
The next step is to configure the template for your business, which is only required once and takes less than 10 minutes:
By default, the CRM template is populated with placeholder data to show you how everything works. When you’re ready, you can easily clear out this placeholder data by clicking on cell B2 of the ‘Customers’ sheet, then holding Cmd/Ctrl+Shift then use the arrow keys (↓ and →) to select the entire table (B4:AB513), then hit delete! That said, it’s a good idea to wait to do that so you can easily copy formulas etc.
3. Set up the Google Sheets CRM for your business in <10 min.
3.1 Define your sales pipeline
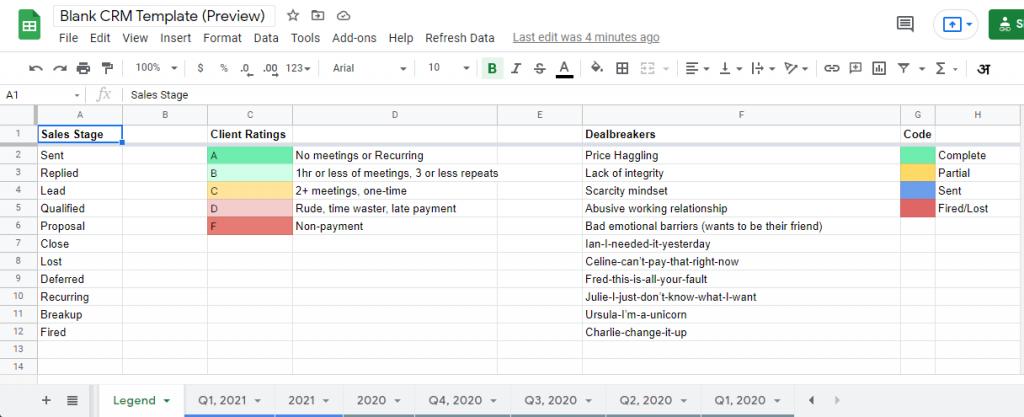
In the ‘Legend’ sheet, you will find the definitions for the various dropdowns in the ‘Customers’ sheet of the CRM. These help you define a clear view of your sales process and client base: including where they came from (Deal Sources), what they’re interested in (Deal Categories), whether they an ideal or non-ideal client (Tier), and whether they have paid you (Paid).
3.2 Adjust opportunity stages
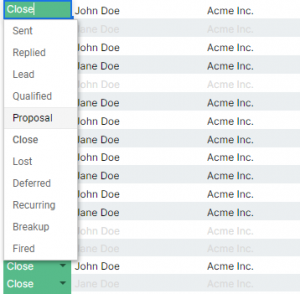
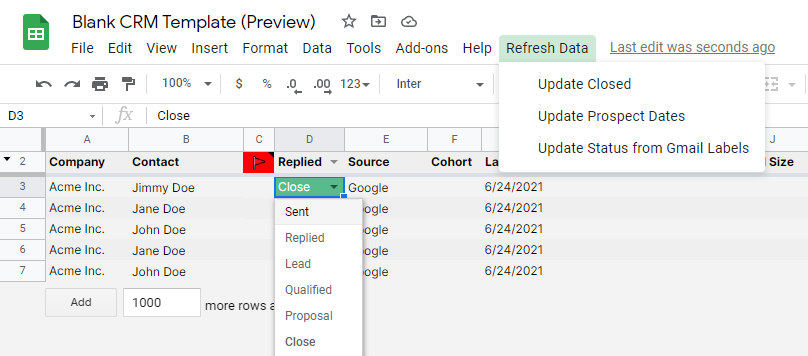
By default, clients are organized in the Google Sheets CRM into 8+ different pre-made stages:
- Sent
- Replied
- Lead
- Qualified
- Proposal
- Close
- Lost
Plus some extra options for classifying lost opportunities:
- Deferred
- Recurring
- Breakup
- Fired
You may prefer to organize your opportunities differently, in which case you can easily customize the corresponding cells in the ‘Legend’ sheet (A2:A12) – the only one that shouldn’t be changed is “Closed” (which denotes when a ‘Prospect’ becomes a ‘Customer’).
For example, maybe your business doesn’t typically send proposals (ie. if you have fixed pricing), in which case you’d want to delete “Proposal” and perhaps replace it with “Demo” or something else.
3.3 Define client codes & grades
The ‘Legend’ sheet also includes a couple “coded” definitions, specifically the following two:
Tier: score your clients
A good CRM will let you score your clients, so you can identify high-value customers and services from quarterly and annual reports. We’ve established an A-F grading system for clients that you can customize to your own needs (Column U of ‘Customers’ sheet).
Progress and Billed : measure progress vs. paid accounts
These two columns (Column L and M of ‘Customers’ sheet) let you easily track open projects and payments, using a simple one-letter code:
- “x” – Partial
- “y” – Complete
- “z” – Sent to Client
- “c” – Fired or Lost
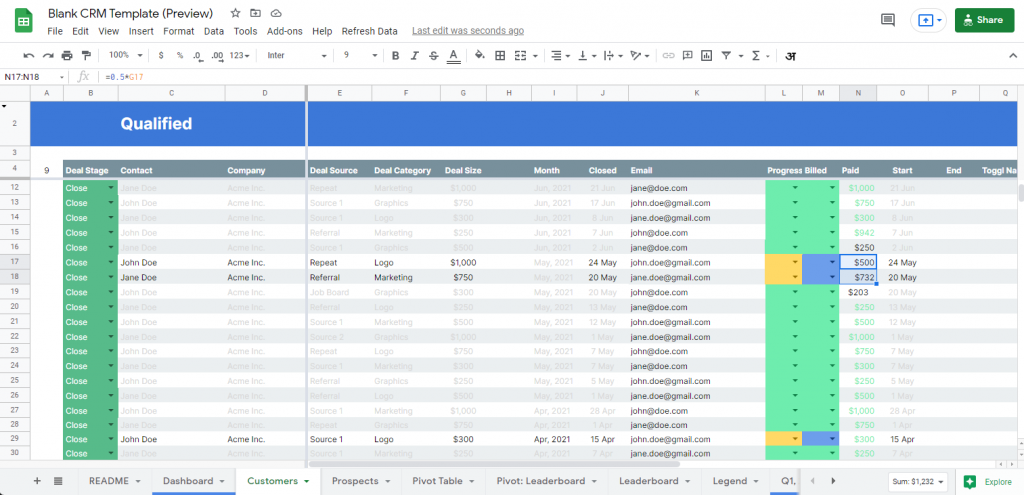
These values are automatically color-coded (as seen in Column G of the ‘Legend’ sheet) to offer you a simple visual overview of open vs. completed projects. Paid and completed accounts automatically become grayed-out rows, so stragglers are easy to spot. If you want, you can switch these letters by modifying the conditional formatting rules.
3.4 Modify fields and specialties
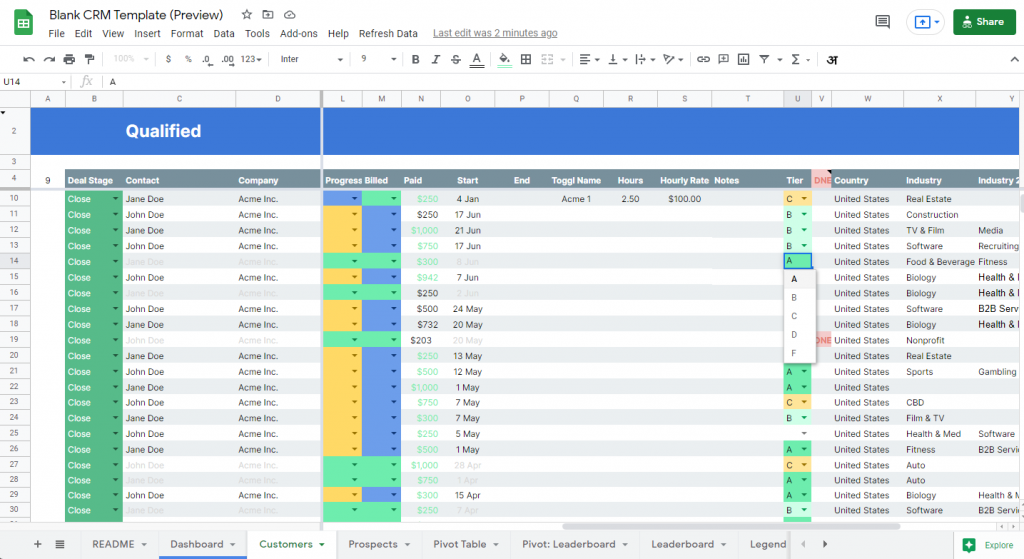
In the ‘Customer’ sheet, there are 20+ different fields / columns to input data about your clients; the most important are the following three:
- Deal source : You’ll want to fill in the most popular sources (where you get your customers from) into the dashboard sheets under “Source Breakdown” (Cells I46:I52 of Dashboard sheets) to view monthly, quarterly and annual reports.
- Deal category : This denotes the type of service or product that each client is interested in (Cells J21:J25 and I33:I38 of Dashboard sheets)
- Closed (and Month) : Use this to specify when a deal closed (as opposed to when you first got connected) — this will correlate directly with the Month for which each client gets counted in the Dashboard sheets (Cells J21:J25 and I33:I38).
4. Input your customer information
Transferring important data can be tricky, but it doesn’t get any easier than copying into a spreadsheet! There are two ways to input your current customer information into your Google Sheets CRM:
Manual input
If you don’t have too many contacts and you’ve done a reasonably good job of keeping track of them all, it won’t take more than 15 minutes to copy it all into the Google Sheets CRM — after all, it is just a spreadsheet!
On the bright side, you don’t have to input all of this data at the same time: you could simply start by adding the last ~20 clients &/or projects, then fill-in the remainder over time. If you just set aside 15-min. a day to update your CRM, you could be done in under a week!
Import from email
Another way to get your customer data into your Google Sheet CRM is to import it from your email. This is a great option if you have one email dedicated to client communications.
If you use Gmail, it’s very easy to export your contacts from your Google account into a CSV. (Here’s a handy article from Google that takes you through the process: Export or back up contacts)
Other email providers such as Outlook and Yahoo also give you this option.
Once you have the CSV file, you can simply copy the information over into your CRM spreadsheet.
5. Setup integrations with Gmail &/or Toggl
The Google Sheets CRM template is also set up for automatic lead tracking from Gmail filters, or time tracking for Toggl — just follow the simple one-time setup on the “README” sheet:
- Click “Tools > Script Editor”
- Set Sheet ID: Copy the value that comes after “spreadsheets/d/” in your Google Sheets URL into line 1 of the Google Apps Script.
- (Optional) – Choose Gmail labels to auto-tag: Add your label names & the corresponding status (Legend, Col A) as new “updateStatus(…)” lines to the function emailStatus() on line 15. (see the comments & examples)
- (Optional) – Track hours with Toggl: Copy your API key from the bottom of the Profile page in Toggl, then copy your workspace ID from the Projects page (it’s the number that comes after “projects” in the URL ie. “12345678” from “track.toggl.com/projects/12345678/list”). Now you can use the GETTOGGL() function as seen in Q8:R9 of the ‘Customers’ sheet
As your business grows, you might want to connect your Google Sheets with other applications (ie. automatically sync submissions from your contact forms as new rows in the ‘Prospects’ sheet) which can be easily accomplished with no-code using Zapier. Alternatively, if you’re a Javascript-savvy developer, you can write your own custom functions for direct integrations with any API of your choice!
Tips to use your Google Sheets CRM effectively
Daily-use of your Google Sheets CRM
You can easily keep tabs on your prospects daily with the Google Sheets CRM built-in reports and functions, simply:
- Add new leads to the ‘Prospects’ tab
- Switch Status column to “Close” and click “Refresh Data > Update New” for new/closed deals (they will be copied to ‘Customers’ tab)
- Keep an eye on the ‘Customers’ tab to identify open projects that may be stragglers for completion or payment.
Quarterly-use of your Google Sheets CRM

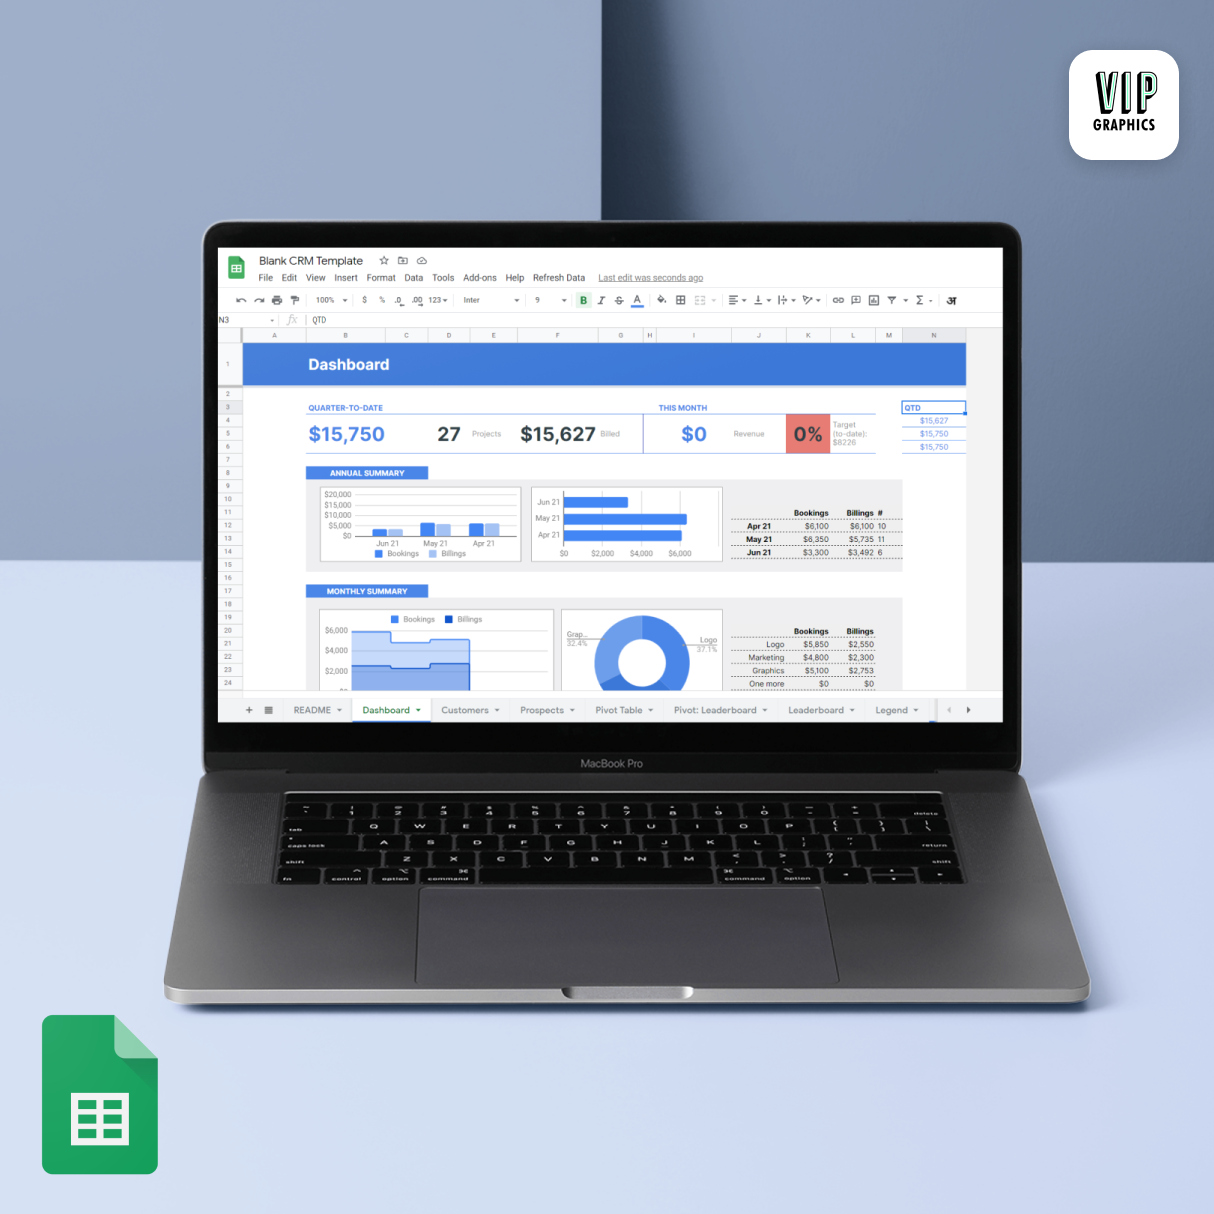
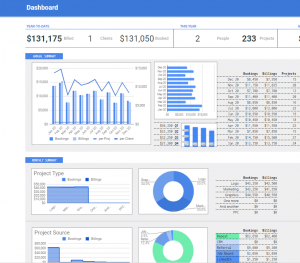
Every quarter (3 months), you’ll want to copy the Dashboard:
- Duplicate the ‘Dashboard’ sheet
- Rename “Copy Dashboard” to “QX, 20XX”
- Find and replace: check “in formulas”, then replace the final date (ie. 2021-07-01 → 2021-10-01)
- Find and replace: check “in formulas”, then replace the start date (ie. 2021-04-01 → 2021-07-01)
Now you’ll have a fresh set of reports with a monthly summary of bookings & billings, as well as a breakdown by Category and Source!
Annual-use of your Google Sheets CRM
Every year, you’ll want to make a new ‘Year’ dashboard:
- Duplicate the previous year’s sheet
- Find and replace: check “in formulas”, then replace the start date (ie. 2021-01-01 → 2022-01-01)
- Find and replace: check “in formulas”, then replace the end date (ie. 2021-12-31 → 2022-12-31)
Now you’ll have a fresh set of reports with a monthly summary of bookings & billings, as well as a breakdown by Quarter, Category, Source and Geography!
Take your Google Sheets CRM to the next level
We demonstrated how to use Google Sheets as your CRM in this article. Our CRM spreadsheet template lets you input data from prospects and existing customers quickly, giving you a better understanding of your sales situation.
That said, as your business grows, you may eventually want to level up to a full-featured CRM with built-in features like email marketing & workflow automation — in that case, we suggest trying our friends over at Octopus CRM. Otherwise, for business owners who don’t benefit from the complexity of modern CRMs, the Google Sheet CRM is the perfect solution (created from personal experience managing an award-winning design agency)!
If your business is ready to take customer relationship management to the next level, you can start with Google Sheets CRM! Want to use the Google Sheets CRM? Download the template now!